Administrator User Documentation
This comprehensive Admin Guide provides detailed instructions for system administrators to effectively manage the platform environment, users, permissions, and data.
The Admin Panel serves as your command center for configuring the platform to meet your organization's specific needs. With the intuitive interface, you can control access to the gIQ platform, customize the analytical environment, and establish workflows that align with your operational requirements.
Getting Started with Platform
When your organization begins using the gIQ platform, the system is configured with a single pre-defined administrative role: the Super User. This role functions as the highest level of administrative authority within the platform.
Super User Role and Administrative Privileges
The Super User possesses exclusive administrative capabilities that cannot be delegated to other roles:
- Full access to all administrative functions across the platform
- Role creation and management
- Permission assignment and access control management
- Organization creation and management
- Platform-wide announcement creation and distribution
- Basemap addition and management
- LLM Chat configuration and settings management
Administrative Hierarchy
As a Super User, you can establish an administrative hierarchy appropriate for your organizational needs. For example:
- Create a System Administrator role one tier below the Super User
- Assign specific administrative permissions to this role
- Delegate day-to-day administrative responsibilities
Unlike the Super User, the System Administrator role will have access only to the specific modules and sub-modules explicitly assigned to it through permission settings.
Note: While you can create multiple roles with varying levels of administrative access, the Super User role remains unique within the system and retains exclusive control over certain platform functions.
Security Considerations
In this section, we will discuss some of the best practices for super user management. In addition, we also discuss how to do better role planning with a few guidelines.
Best Practices for Super User Management
- Ensure there no more than two super user roles in the system
- Do regular audits for Super User activities
- Create documented procedures for Super User account management
Role Planning Guidelines
- Map your organizational structure to appropriate role hierarchies
- Implement the principle of least privilege when assigning permissions
- Create role templates for common organizational positions
- Document the purpose and scope of each created role
Overview: Admin Panel
This guide presents information on the all the sub-modules available in the Admin Panel. The Admin Panel consists of the following sub-modules:
-
Users
-
Roles
-
Settings
-
Data Management
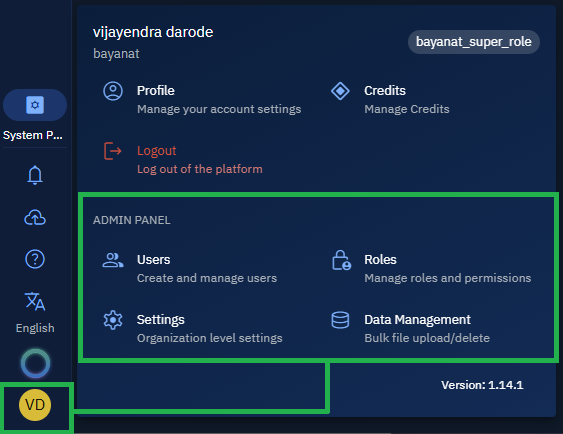
Accessing Administration Panel
In this section, you will get to know how to access Admin Panel.
To access Admin Panel, do the following:
-
Log in to the platform.
-
Click your User Profile Avatar and then access the Admin Panel.
Users
The User Management sub-module of the Admin Panel allows you to create, edit, and manage user accounts. This includes controlling user access, managing authentication, and performing bulk operations.
Each user profile in the system consists of the following information:
- Full Name: The user's complete name (required)
- Username: A unique identifier for the user (required)
- Email ID: The user's email address for communications and account recovery (required)
- Roles: The role or roles assigned to the user
- Account Status: The user's account status (Active or Inactive)
- User Photo: An optional profile image for the user
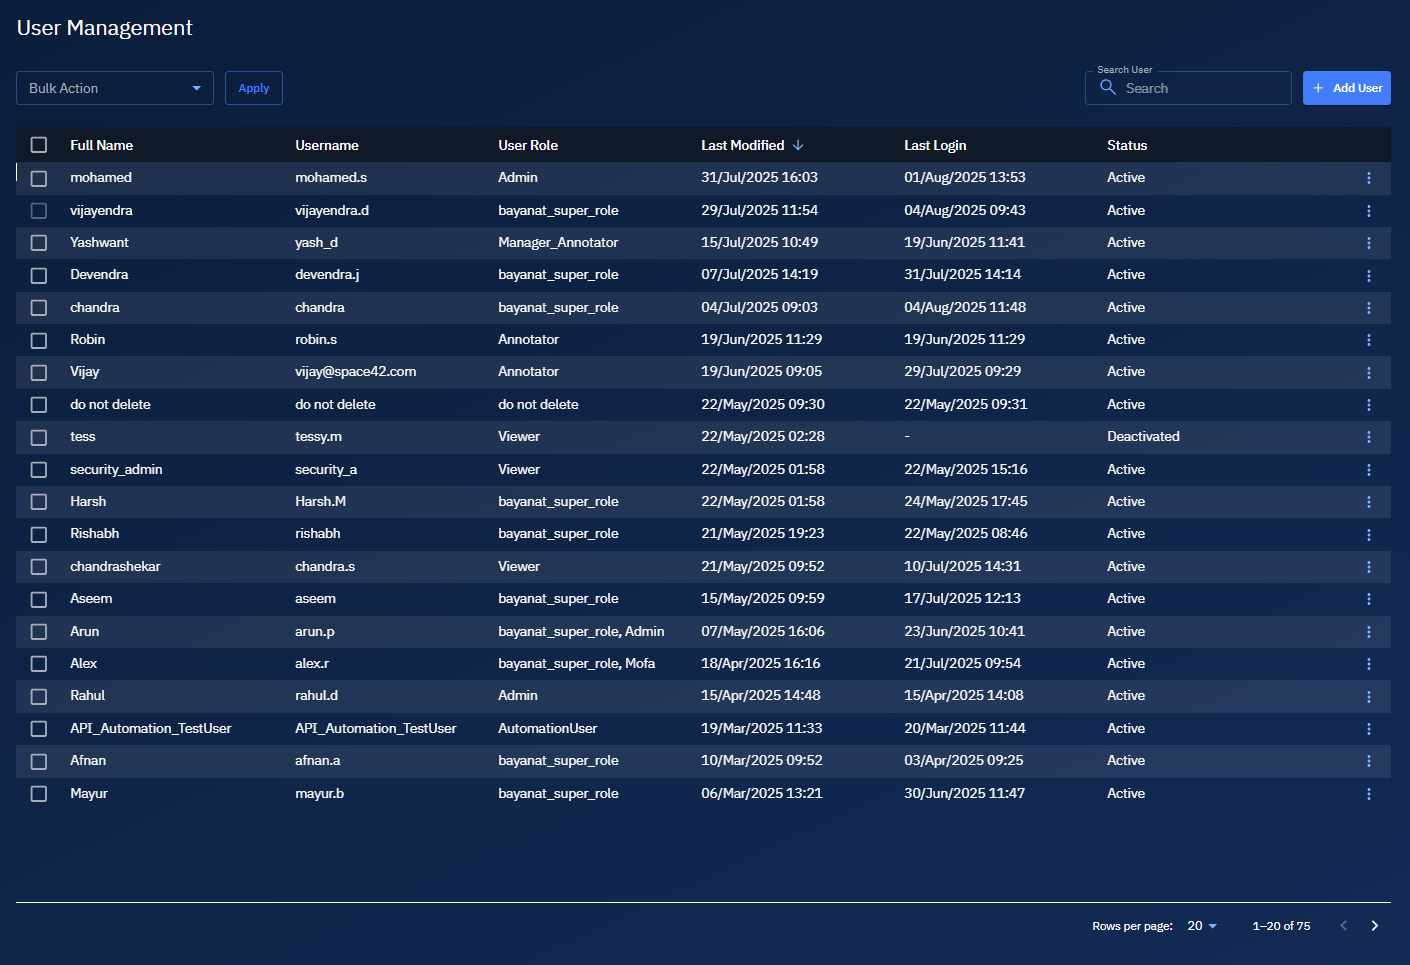
Accessing User Management
In this section, you will get to know how to access the User Management sub-module.
To access the User Management sub-module, do the following:
-
Login to the platform.
-
Click the User Profile Avatar and then click the Users sub-module.
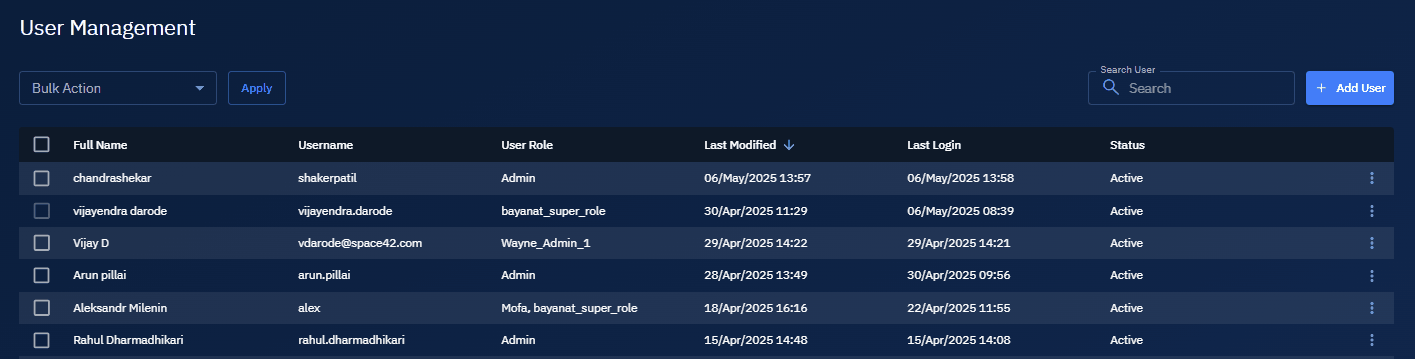
The User Management page is displayed:
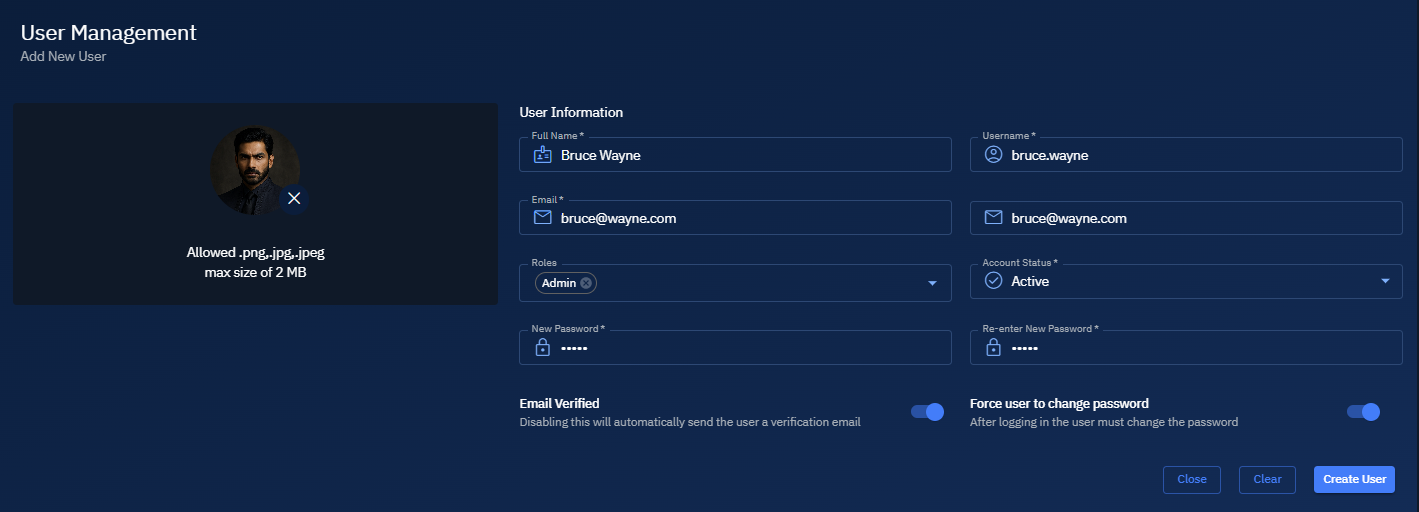
Creating a User
This functionality enables you to add a new user to the platform.
To create a user, do the following:
-
Click your avatar, and then select the Users section in the Admin Panel.
The User Management page is displayed.
-
On the User Management page , click the Add User button.
The User Management - Add New User page is displayed.
-
On the Add New User page, type or select the following information:
- Full Name
- Username
- Email ID
- User Photo (optional)
-
Assign the appropriate role(s) to the user.
-
Toggle the Email Verified button to enable or disable the user to bypass the email verification.
-
Toggle the Force user to change password option to enable or disable mandatory password change when a user signs in to the platform for the first time.
-
Click the Create User button to create the user account.
The new user will now appear in the user list and will have access according to their assigned role(s).
Managing Users
In this section, you will get to know how to manage users namely editing user details, searching users, activating or deactivating users, and deleting users.
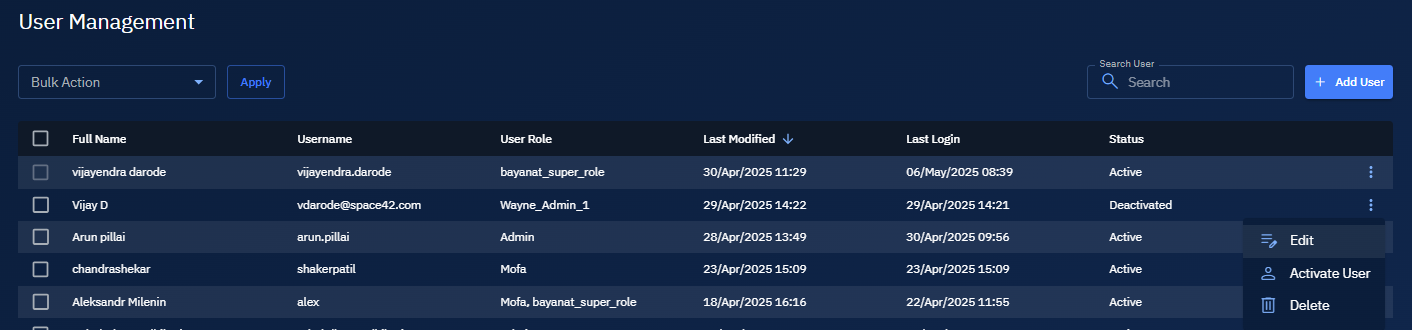
Editing User Details
In this section, you will learn how to edit user details.
To edit user details, do the following:
-
Click your avatar, and then select the Users section in the Admin Panel.
The User Management page is displayed.
-
On the User Management page, locate the user whose details you want to modify, click the vertical three-dots menu, and then select the Edit option.
The User Management - Edit User page is displayed.
-
On the Edit User page, modify user details, and then click the Update User button.
NOTE: You are NOT permitted to the change the username.
Searching Users
In this section, you will learn how to search users.
To search a user, do the following:
-
Click your avatar, and then select the Users section in the Admin Panel.
The User Management page is displayed.
-
On the User Management page, type the name of a user in the Search box.
The platform will automatically filter and display matching users as you type in the search bar.
Activating or Deactivating Users
In this section, you will learn how to activate or deactivate users.
To activate or deactivate a user, do the following:
-
Click your avatar, and then select the Users section in the Admin Panel.
The User Management page is displayed.
-
On the User Management page, locate the user whose details you want to modify, click the vertical three-dots menu, and then select the Deactivate option.
The user is instantly deactivated.
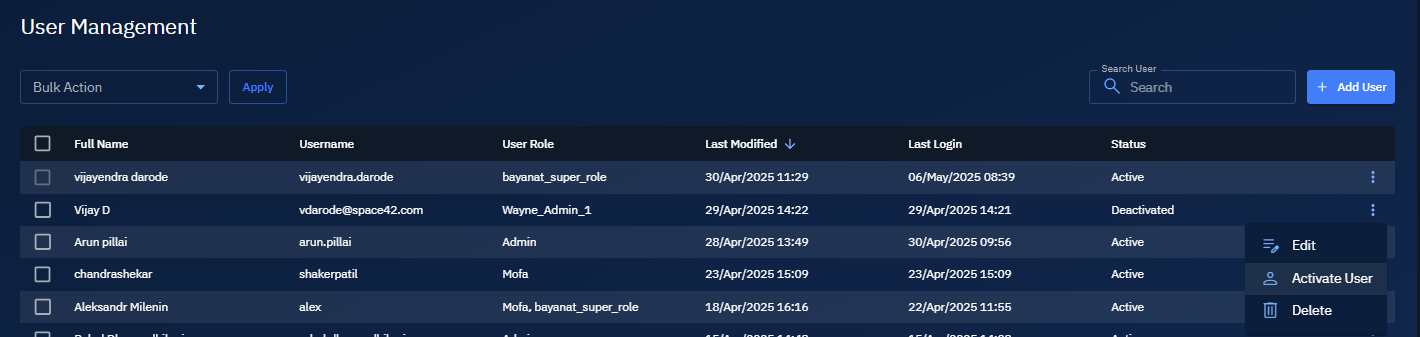
NOTE: Deactivated users cannot log into the system but their accounts and data remain intact.
Deleting Users
In this section, you will learn how to delete the users.
To delete a user, do the following:
-
Click your avatar, and then select the Users section in the Admin Panel.
The User Management page is displayed.
-
On the User Management page, locate the user whose details you want to modify, click the vertical three-dots menu, and then select the Delete option.
The user is instantly deleted from the system.

Warning: Deleting a user will permanently remove their account and may affect data associated with the user.
Bulk User Operations
Bulk actions apply immediately to all selected users, making it efficient to manage large numbers of user accounts.
To perform actions on multiple users simultaneously, do the following:
-
Click your avatar, and then select the Users section in the Admin Panel.
The User Management page is displayed.
-
On the User Management page and then select users you want to activate or deactivate in bulk.
-
Click the Bulk Action drop-down list and then select one of the following options:
- Activate: Enable access for multiple users
- Deactivate: Disable access for multiple users
-
Click the Apply button.
The selected users are instantly activated or deactivated in the system. Verify the Status of the users to confirm the action is performed successfully.
Roles
In this section, you will learn how to manage role namely create a new custom role, rename role, duplicate a role, and delete a role.
Accessing Role
In this section, you will get to know how to access the Role Management sub-module.
To access the Role Management sub-module, do the following:
-
Login to the platform.
-
Click the User Profile Avatar and then click the Roles sub-module.
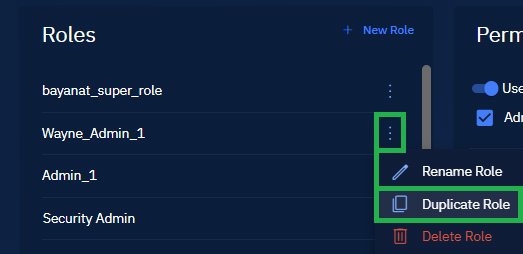
The Roles Management page is displayed:
Creating a role
To add a new role to the system, do the following:
- Navigate to the Roles section of the Admin Panel
- Click the Add New Role button
- Enter a name for the new role
- Click Save to create the role
After creating a role, you can assign permissions to it as described in the Permission Assignment section.
Managing Existing Roles
The following actions can be performed on existing roles:
Rename Role:
- Select the role you wish to modify
- Choose the Rename option
- Enter the new name for the role
- Save the changes
Duplicate Role:
- Select the role you wish to duplicate
- Choose the Duplicate option
- Provide a name for the new role
- Save to create a copy with the same permissions
Delete Role:
- Select the role you wish to remove
- Choose the Delete option
- Confirm the deletion when prompted
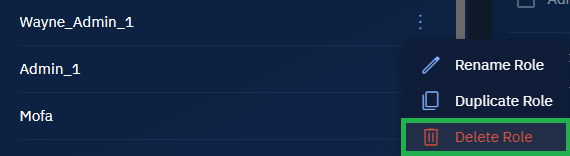
Note: Deleting a role does not delete users assigned to that role, but it will remove the permissions associated with that role from those users.
Role-Based Access Control
The Role Management section allows administrators to create and manage user roles and their associated permissions. This establishes a framework for controlling access to different features and data within the platform.
Role Taxonomy
The system includes the following default role:
- Super User: Has full access to all system features and functionalities
This role is created automatically when the system is initialized and serves as the primary administrative role.
Permission Assignment
The platform uses a permission-based system to control access to various features and functions. Permissions are assigned to roles, and users inherit permissions based on their assigned roles.
To view and manage permissions, do the following:
- Navigate to the Roles section of the Admin Panel
- Select a role to view or modify its permissions
- Navigate to the Permissions page to see available permissions
- Select or deselect permissions as needed
- Save changes to apply the updated permissions
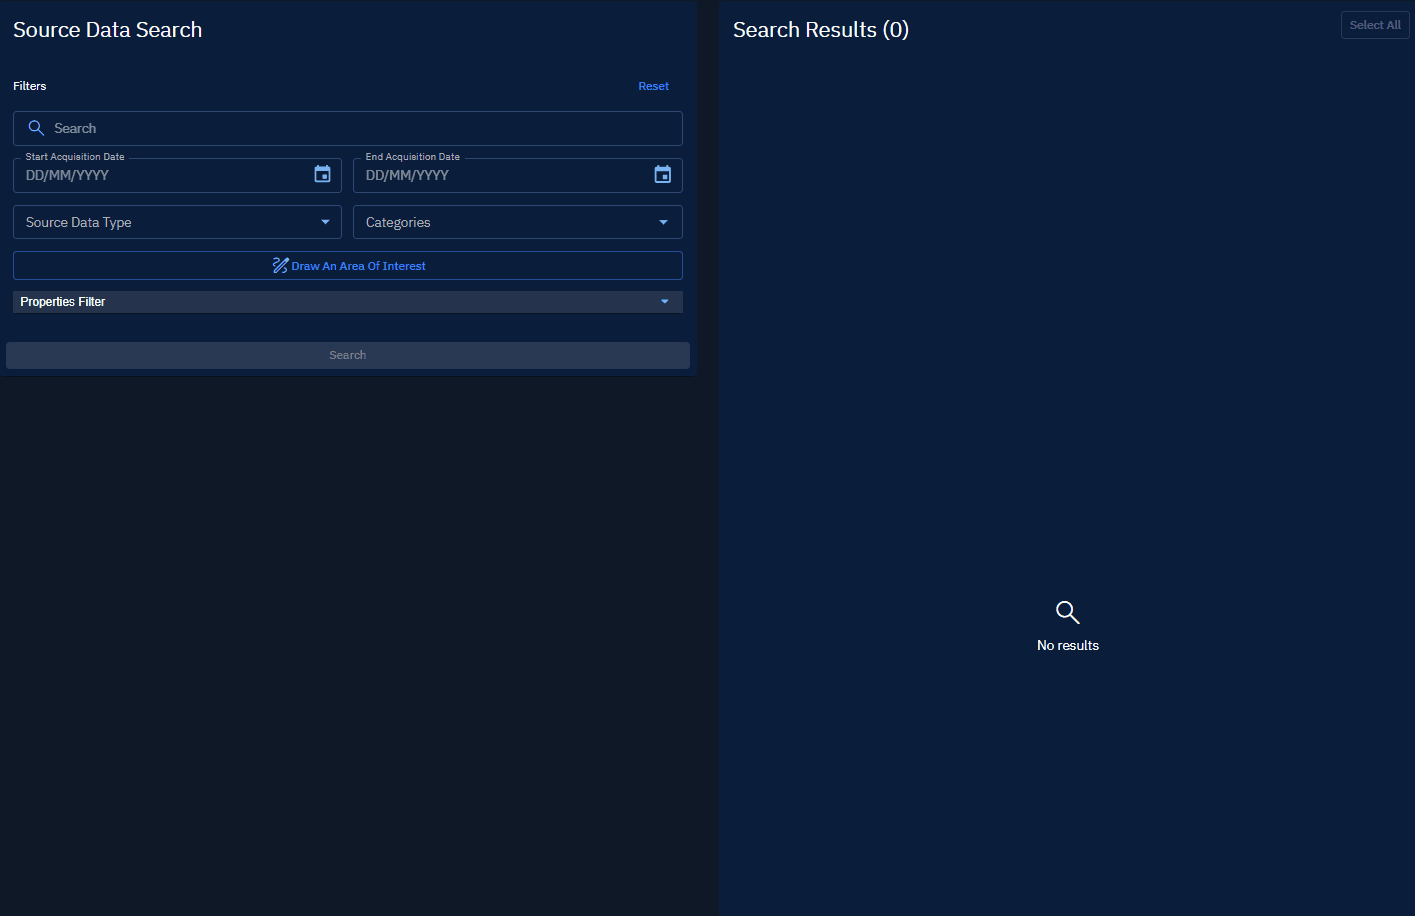
Data Management
The Data Management section provides tools for searching and managing geospatial data within the platform to perform data cleanup operations efficiently.
NOTE: All the following search filters and tools can be used individually or in combination with each other.
To perform a search with multiple criteria:
- Navigate to the Data Management section
- Apply any combination of the available filters
- The system will display layers that match all selected criteria
- Clear filters to start a new search
Accessing Data Management
Search by Text
This is a simple text-based search that enables you to find geospatial data in the platform.
To search geospatial data by name, do the following:
-
Click your aavatar, and then select the Data Management section in the Admin Panel.
The Source Data Search page is displayed.
-
On the Source Data Search page and then type a search query in the Search box.
-
Click the Search button.

The search results for the query are displayed.
Search by Area of Interest (AOI) Definition
Simply draw an AOI on the adjoining map to find data of the geolocation.
To search geospatial data by AOI, do the following:
-
Click your aavatar, and then select the Data Management section in the Admin Panel.
The Source Data Search page is displayed.
-
On the Source Data Search page , click Draw an Area of Interest button. The Draw an Area of Interest dialog box with a map is displayed.
-
On the Draw an Area of Interest dialog box, do one of the following:
- Draw an area of interest on the map with the Square or Polygon tool.
- Type the location coordinate or location name in the Search box.
-
Click Save to confirm the area of selection.
-
Click the Search button to find geodata of the specified location.
The search results for the query are displayed.
Advanced Search Capabilities
The platform provides multiple search criteria that can be used individually or in combination:
- Layer Name: Enter text in the search box
- Date Range: Select start and end acquisition dates
- Source Data Type: Filter by the type of source data
- Category: Filter by layer category
- Properties: Filter by specific layer properties
Settings
The Settings section allows you to modify the appearance and display language of the platform to match organizational requirements and user preferences.
Visual Interface Management
As the name suggests, you can change the color scheme (skin or theme) of the platform.
To change the color scheme, do the following:
- Click your avatar, and then select the Settings section in the Admin Panel.
The Settings page is displayed.
- On the Settings page, click the Color Scheme drop-down list, and then select one of the following options:
- Default Theme: The standard appearance of the product
- UAE Federal: Theme customized for UAE Federal organizations
- AID: Theme customized for AID organizations
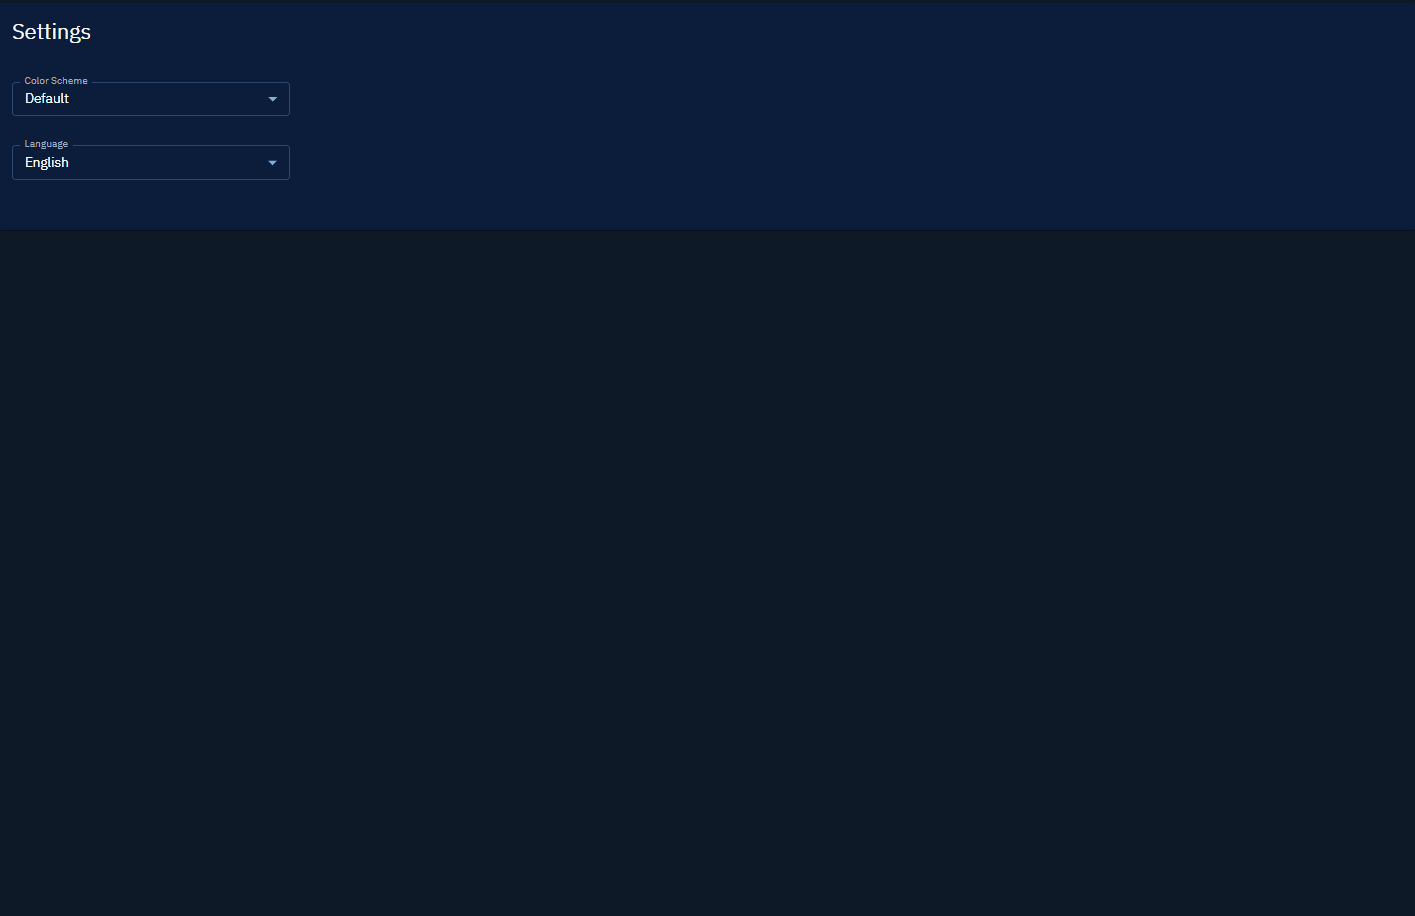
The selected theme will be instantly applied to the entire platform for all the users.
Localization
You can change the display language of the platform.
To change the display language of the product:
- Click your avatar, and then select the Settings section in the Admin Panel.
The Settings page is displayed.
- On the Settings page, click the Language drop-down list, and then select one of the following the preferred display language:
- English
- Arabic
The selected language will become the default interface language for all users.
Customizing the Platform
The Settings section allows you to modify the appearance and display language of the platform to match organizational requirements and user preferences.
Visual Interface Management
As the name suggests, you can change the color scheme (skin or theme) of the platform.
To change the color scheme, do the following:
- Click your avatar, and then select the Settings section in the Admin Panel.
The Settings page is displayed.
- On the Settings page, click the Color Scheme drop-down list, and then select one of the following options:
- Default Theme: The standard appearance of the product
- UAE Federal: Theme customized for UAE Federal organizations
- AID: Theme customized for AID organizations
The selected theme will be instantly applied to the entire platform for all the users.
Localization
You can change the display language of the platform.
To change the display language of the product:
- Click your avatar, and then select the Settings section in the Admin Panel.
The Settings page is displayed.
- On the Settings page, click the Language drop-down list, and then select one of the following the preferred display language:
- English
- Arabic
The selected language will become the default interface language for all users.